Self Starting Slide Shows on CD
From XnView Wiki
The previous topic Slide Shows describes how to create and display slide shows. However a much more elegant and attractive option would be to have Slides Shows which are stored on CD, and which start automatically (without installing XnView) when the CD is put into a PC. Here a slide show becomes an electronic photograph album which can be sent to friends and family.
The CD will include the image files, the slide show file, the XnView program and an additional file "autorun.inf". You will gather these contents step-by-step. Please follow the steps below.
- First, you have to gather all the image files that you want to use in the slide show and burn on CD. For this, you create a temporary directory e.g. temp_slideshow_dir, on your PC using windows Explorer or XnView the Browser; click on the applicable symbol in the toolbar).
- Next step is to select and process the images. CD's have a capacity of about 700 MB, unless you want to save many images on CD, that means more than 200 images, you do not have to care for file size. Also the images' dimension (Width and height) does not matter too much, since XnView fits the images to the monitor's resolution - given that the appropriate option has been set. Since monitor resolutions get higher and higher and your slide show should still look nice in a couple of years, we recommend using the JPG image format with a 1600 x 1200 pixel resolution. You can resize an image by opening the image in XnView and then select the menu Image>Resize image. For multiple images you use the Batch Conversion. Naturally, you do not enlarge smaller images. When enlarging, no new details appear and XnView can do the enlargement when setting the appropriate option, automatically.
- Select the images for your slide show. Copy them to the temporary directory created in the first step. Use either the Windows Explorer or the XnView Browser (Edit>Copy to.... The Copy dialog is displayed.
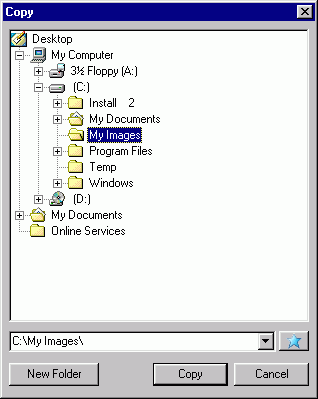
- Input the target directory (e.g. temp_slideshow_dir) in the Copy dialog. This can be typed in directly or by using the ... button. XnView remembers the target directory the next time the Copy dialog is opened and lists it in the drop down list. Collect all image files in the temporary directory.
- Once all the images are collected in the temporary directory, creating the slide show is straight forward (described in detail in the Slide Shows - Create and Display chapter).
- Choose the Menu option Tools>Slide Show.... The Slide Show dialog is displayed.
- In the Slide Show dialog, choose the button More Options.... The Options dialog is displayed, with the general slide show options.
- Change the slide show options as required. The slide show should run independently of any paths and drives, therefore check the Save Relative Paths in SLD file check box.
- Confirm your settings by pressing the OK button.
- In the Slide Show dialog, choose the Add Folder... option and select the temporary directory created earlier. After confirming this directory, all the image files previously copied will be displayed in the File List.
- Change the display order and/or slide show options as required. Changes can be tested using the Go button.
- When you are satisfied with the selection, options and display order, save the slide show using Save.... The Save Picture dialog is displayed.
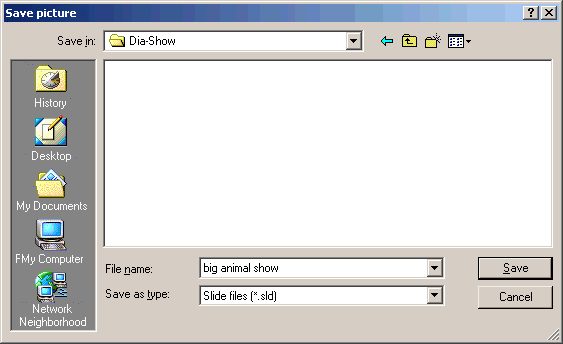
- Save the slide show in the temporary directory previously created using a meaningful name e.g. "Holidays Crete 2003". You do not need to specify a file extension, the extension *.sld is added automatically by XnView.
- You have now gathered the images and created the slide show, there are two things left. The slide show should work on any PC, regardless of whether XnView is installed already or not. For this reason, on the CD you save a version of XnView which can be directly started from CD. If you have not already done so, download the ZIP archive of XnView from the web, the minimal version is sufficient. Unzip the ZIP-archive to the directory "temp_slideshow_dir". When unpacking the ZIP-archive, the sub-directory called "XnView" is created automatically during unzipping.
- Finally the file "autorun.inf" must be created. Whenever inserting a CD, the system searches the CD for this file and if it exists, it executes the commands contained. The file "autorun.inf" is a text file, which you can create using "Notepad". Start the editor by selecting the windows menu Start>Programs>Accessories>Notepad. Notepad opens an empty text document. Enter the lines below:
[autorun]
open=.\xnview\xnview.exe -slide "Holidays Crete 2003.sld"
- Save the text file as "autorun.inf" in the temporary directory previously created.
- Now you have gathered all the files and you can burn all the files to a CD. In case it's your first image CD with XnView, we recommend to use a re-writeable CD and then check the slide-show. Insert the CD into your PC and if everything went o.k., the slide show will start automatically.

